How to Add an Image Background to your Squarespace Website’s Mobile Menu Website Styling Tips
We’re all above elevating the look of our clients website’s online, and there are so many cool tricks we’ve got up our sleeve that we’re dying to share with you!
This trick, in particular, takes your mobile web experience to a whoooole new level 🙌 We’re going to walk you through how you can add a background image to your mobile menu, creating a much more dynamic, personalized and on-brand menu for your potential clients.
As you may already be aware, Squarespace has never offered such a feature (at least not yet) so in this blog post, we’re going to teach you how to do it yourself, and we may dive into a little bit of CSS code too (dontcha worry!)
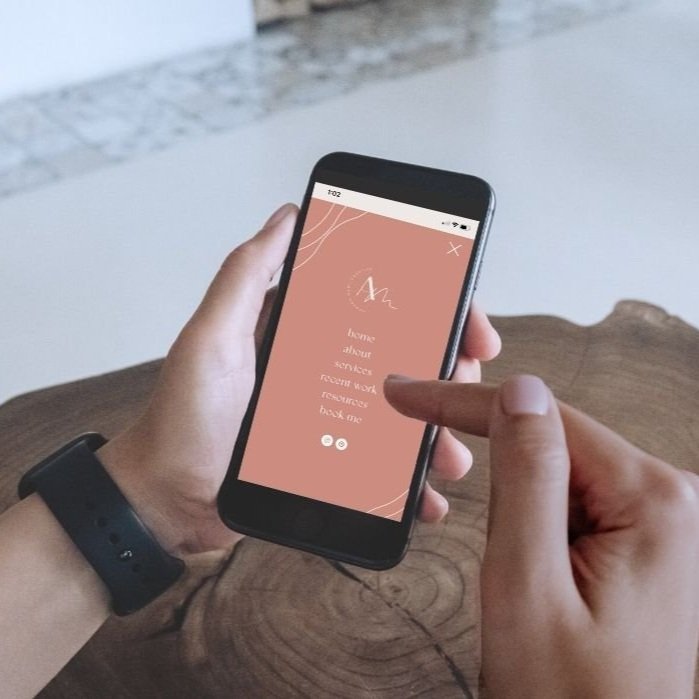
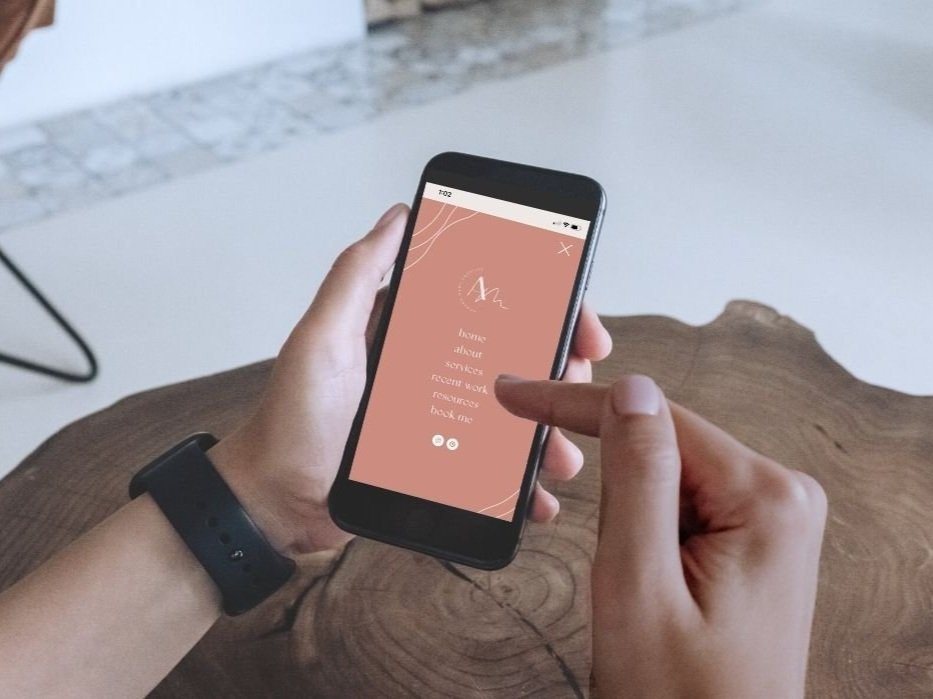
HERE’S AN EXAMPLE OF what a styled mobile menu can look like:
This is a mobile menu designed for our client Amanda Mary, from Amanda Mary Creative. We wanted to ensure every little detail of her clients mobile experience is dialed-in and on brand, so we added a custom branded mobile menu to her website! Feel free to learn more about that project here.
Let’s dive right in and show you how you can easily add a background image to your mobile menu:
Before we get started, you’ll need to know what version of Squarespace. Whether you are on the newer platform (Squarespace 7.1) or older version (Squarespace 7.0). With 7.0, this will only work for you if you are using the BRINE template (which all of our templates use)
So, how do I find out what version my site uses?
If you already have a website built on Squarespace, the simplest way to check which version of Squarespace your website is on is to log into your Squarespace website, click on Help and then scroll all the way to the bottom of the left panel. There you will find a note stating which version your website is on!
Now let’s dive into the details on how to add a mobile background image depending on your Squarespace website version:
SQUARESPACE VERSION 7.1:
STEP ONE: CREATE YOUR BACKGROUND IMAGE
You’ll first need to create a background image for your mobile menu. We always find it easiest to do in CANVA, although you can use any image editing program such as Adobe Illustrator or Photoshop too! Size out your canvas to 1080x1920 PX, place your image in the Canvas and save as a JPEG or PNG (even animated GIF’s work too!).
STEP TWO. UPLOAD YOUR IMAGE INTO yoUR WEBSITE CSS
To do so, under the WEBSITE tab, scroll all the way to the bottom > WEBSITE TOOLS > CUSTOM CSS. You can also use the search function and type “custom css” or “css”. Here’s more info on customizing css.
You’ll then see a button “MANAGE CUSTOM FILES” right below the white code block square. Click on “MANAGE CUSTOM FILES” and upload your image (feel free to drag and drop the image in to make it easier too). Once you have your image uploaded, copy and paste this code below into the white code block square:
// custom mobile background image //
.header-menu .header-menu-bg {
background-image: url(your-url-here);
background-size: cover;
}
Click into the text within the brackets (your-url-here) and remove the text (still keeping the brackets and click on the image you’ve just uploaded within the MANAGE CUSTOM FILES dropdown. This will then paste the URL link into the brackets, telling the mobile background image to use this image you’ve uploaded! Feel free to watch our tutorial video below to see it all in action!
Now let’s dive into Version 7.0 using the Brine template.
SQUARESPACE VERSION 7.0 (BRINE):
STEP ONE: CREATE YOUR BACKGROUND IMAGE
Exactly the same as above. You’ll first need to create a background image for your mobile menu. We always find it easiest to do in CANVA, although you can use any image editing program such as Adobe Illustrator or Photoshop too! Size out your canvas to 1080x1920 PX, place your image in the Canvas and save as a JPEG or PNG (even animated GIF’s work too!).
STEP TWO: UPLOAD YOUR IMAGE INTO yoUR WEBSITE CSS
Exactly the same as above as well, except we will be using a different snippet of code!
First, jump to DESIGN > CUSTOM CSS. You’ll then see a button “MANAGE CUSTOM FILES” right below the white code block square. Click on “MANAGE CUSTOM FILES” and upload your image (feel free to drag and drop the image in to make it easier too). Once you have your image uploaded, copy and paste this code below into the white code block square:
// custom mobile background image //
.Mobile-overlay-menu{
background-image:url(url-goes-here);
background-size:cover;
width: 100%;
}

.Mobile-overlay-close{z-index:2}
Click into the text within the brackets (your-url-here) and remove the text (still keeping the brackets and click on the image you’ve just uploaded within the MANAGE CUSTOM FILES dropdown. This will then paste the URL link into the brackets, telling the mobile background image to use this image you’ve uploaded! Feel free to watch our tutorial video below to see it all in action!
You did it!
See? It’s that easy! With a little bit of CSS code magic, you now have a custom mobile menu that you can style as you wish to enhance your overall user experience!

Looking to make a strong first impression with your website?
Our Squarespace website templates may be the right fit for you! Our DIY option allows you to play and plug your content and get you launched pronto!