Canva Tips for Creating Graphics for Your Website

Building up your digital toolbox is important for when you are wanting to create your online presence, from easy to use website builders (hello Squarespace!) to stock photography websites. And when it comes to creating your own graphics… CANVA is an incredible resource to have on hand (trust us!)
While Photoshop has become a household name for years, there is quite a bit of a learning curve to get a good grasp on the tools and functionalities. Here’s where CANVA comes in… it’s an online-based program with options to either start from scratch or use pre-made templates, allowing you to switch up colours/typography/photos with the click of a button.
Because of it’s intuitive interface and user-friendly capabilities, we’ve created CANVA templates for you to update the various graphics found throughout all of our Squarespace website template kits. From there, you can open up a template, switch out your photo, update the colors to match your brand, and click save. And just like that, you have your own website graphics ready to go!
Note: While CANVA has a great mobile-friendly app, we personally recommend using the online/desktop version when creating your web graphics.
Looking for a few more tips before diving in? We’ve got you.
free vs. pro versions
What attracts many people to CANVA is that there is a FREE version (#heckyes), and we’re amazed with how much you can accomplish going this route.
With that, we do recommend going with PRO, as there are quite a few advantages that will really help take your website graphics to the next level.
For us, typography is so important, and with PRO, you are able to upload your own fonts. This helps create a consistent brand, and will allow you add that unique touch to your graphics. While the FREE version has many amazing fonts to choose from, if you’re eager to use whatever fonts you’d like, PRO’s the way to go.

Another advantage of PRO, especially with a lot of our graphics found throughout our website templates, is you can save a PNG file with a transparent background. This prevents your graphics from having unintentional white backgrounds and will give your website a cleaner look!
TIP: You can also get a free 30 day trial to the PRO version, and we highly recommend signing up for at least the trial while you work on your website.
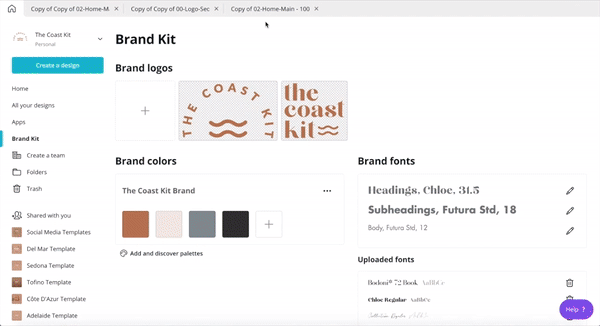
create a brand
To keep things even *more* consistent, we recommend creating a BRAND KIT in your CANVA account. You can simply upload your logos and fonts, as well as save your brand colors for quick reference. Then when you create a new graphic, all of those options are easy to grab and you’ll save time trying to find “that doc you saved all of your hex codes”.
uploads + elements
CANVA allows you to access all of your uploads anytime you’re working on your designs. We recommend uploading your logos (transparent PNGS are best), photos, and any other brand elements you have, like textures. And from there, it’s a simple drag and drop.
We recommend exploring some of the ELEMENTS that CANVA also offers.
FRAMES: allows you to place your images in a variety of shapes.
SHAPES: add in some simple elements, such as borders, and each of these can easily be changed to any color.

TIP: If you double click an image once it’s in a frame, you can easily move around and resize from there.

make a copy
Another time-saving tip that CANVA offers is the ability to COPY your templates. While working on a template, you can simple COPY PAGE and play around with a few different ideas, all on the same artboard! This works great if you have banners that have different images, but the same layout!

You can also COPY the whole template into a completely new design, simply by going to ALL YOUR DESIGNS, hovering over and MAKE A COPY. You can easily rename your new design, and your original design will stay completely as is. You can also go through this process once you have your template open, and click FILE -> MAKE A COPY.
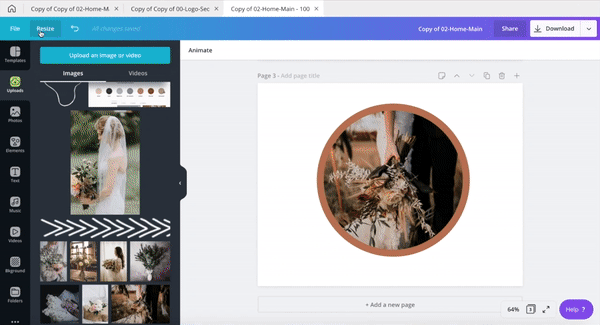
If you love all of your elements, but want to resize your design, you can simply click RESIZE, choose your DIMENSIONS, and COPY & RESIZE (we love this when creating Instagram squares and Instastories that have a similar style).
TIP: Keep an eye on your titles to make sure they are still relevant!

saving your graphics
The whole point of creating your graphics in CANVA is the ability to save these for web and upload to your website! Here’s where this step comes in!
When your graphics are all ready to go, click DOWNLOAD and choose from a few options.
We recommend JPGS for banner images, as these tend to be lower in file size. Most of our templates are 2000px wide for these, and Quality at 80% tends to work well.
For other graphics, such as collages, logos, etc, that need a transparent background, we recommend using PNG. We suggest keeping the size as is (1x) depending on our templates, but if you feel the quality could be better, feel free to try between the 1.5-2x. This will make the image larger (and could take longer to load on your website).

TIP: For transparent PNG’s, we recommend looking at your file size and making sure those are under 1MB. If possible, you can always compress your PNG’s to make those images even smaller in file size! We love using compresspng.com to make that happen!
Here’s a breakdown of how to prep your graphics + photos.
Banner Images - 2000px wide - under 1MB - color RGB - JPG
Logo - 600px wide - under 500KB - color RGB - PNG (transparent)
Favicon - 200px wide - under 100KB - color RGB - PNG (transparent)
Graphics (such as the collage) - 1000px wide - under 1MB - color RGB - PNG (transparent)
Photos - 1000px wide - under 750KB - color RGB - JPG
organizing your graphics for web
Before uploading your graphics online, we recommend taking a bit of time to organize your files. Having a folder for each page will help keep things tidy, and as CANVA may save some as .ZIP files, this keeps your graphics all in the right place.
We suggest also renaming most of your files, so that they are relevant to each page, as well as your business name (and location if it’s important) as this can help with SEO.
An example would be, instead of '1.png’ can be ‘blooms-floral-design-vancouver-about-banner.png’.


